

© Xara Group 2008


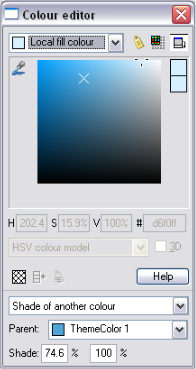
Now you want to color your flakes. I wanted to make mine a
lighter shade of my blue background color, so I opened the
Color Editor again and then selected ‘Shade of another
color’ in the drop down menu. It automatically selected my
blue Theme Color 1 as the parent color since it’s the only
Named Color in this document. I changed it to a lighter
shade of blue and gave the new color a name ‘Linked Color’.
This now appears on the Color Line next to Theme Color 1.
In fact I decided it would be better if all the flakes
had a slightly different color, so I selected each
flake individually, selected the Fill tool and dragged
across the flake to give it a graduated color fill from white
to my Linked Color 1, each flake with a slightly different
graduation.
I also applied different levels of flat transparency to each
flake, to give a good variety of different flakes, with varying
colors and transparency (note it must be flat transparency -
you can’t combine grad transparency with grad color fills in
Flash). Select your flake, go to the Transparency tool and
adjust the transparency level with the slider.
The design needs more flakes but you can save time by just
making copies. I copied my 6 basic flakes and made a total
of 18 flakes of various sizes. Arrange the flakes into two
groups, group them (I have selected 12 flakes in the top
group, then click Ctrl + G) and give the groups names,
‘Flakes 1’ and ‘Flakes 2’ (as before, select a group, click the
Name icon on the InfoBar, enter the name).
This is what my arrangement looked like at this stage. Note
the main group of flakes is mostly outside the blue
background area, because I want it to look like the snow is
falling from above. The flakes outside my page area won’t
be visible in my animation because they outside the page
(animation) size.
Also you need to introduce the first line of the text
message in Frame 1. The effect we want is a text
message that fades in and grows larger - you can do
that by putting some transparent text in this frame, then
making it visible and larger in the next frame. So, select
the Text tool and type ‘Seasons Greetings’ in a small point
size below the bottom of the blue background, make it
100% transparent (that means you can’t see it unless you
change to Outline view - that is, move the quality slider to
the far left). Name the text object ‘Text’.
Change the Timings
Before we move onto Frame 2 we’ll change the
speed of the animation by adjusting the timing of
the first frame. Open the Frame Gallery and double click
on the Frame 1 name to open the frame Properties, and
change the time from 0.5 to 6 seconds. This means it will
take 6 seconds to animate ‘tween’ from key frame 1 to 2.


Xara Xtreme - Xmas Flash Animation -2-

A Named Color that is a shade of Theme Color 1

The final image for Frame 1


